Ktor as a backend that can be built in a blink of an eye - part 1


This article is the first part of the three-part series that will smoothly introduce Ktor as a backend to you.
I am sure that if you are an Android Developer with some good background, experience in Kotlin, and some fun with Kotlin Multiplatform – you don’t think of yourself as a full stack dev – but you should! All the good practices, well-known libraries, and functional ways of programming can be transferred from Android to a different domain and still make things happen.
In this article, I would like to introduce you to Ktor as a backend for your application. It is a brilliant and ready-to-go solution that can be built in a blink of an eye. The Ktor itself provides the best definition:
“Ktor is a framework to easily build connected applications – web applications, HTTP services, mobile and browser applications. Modern connected applications need to be asynchronous to provide the best experience to users, and Kotlin coroutines provide excellent facilities to do it easily and straightforwardly.”
[https://ktor.io/docs/welcome.html]
The project is available on GitHub
Let’s create a project
For example, we will create a simple Game Shop where users can view available games and place an order.
With IntelliJ is very easy to bootstrap your project as the IDE got a dedicated plugin to create the Ktor project.
Open IntelliJ and follow the steps:
- Run the project Wizard New Project or File | New | project
- Choose Ktor from the generators section
- Fill the project details with desired data

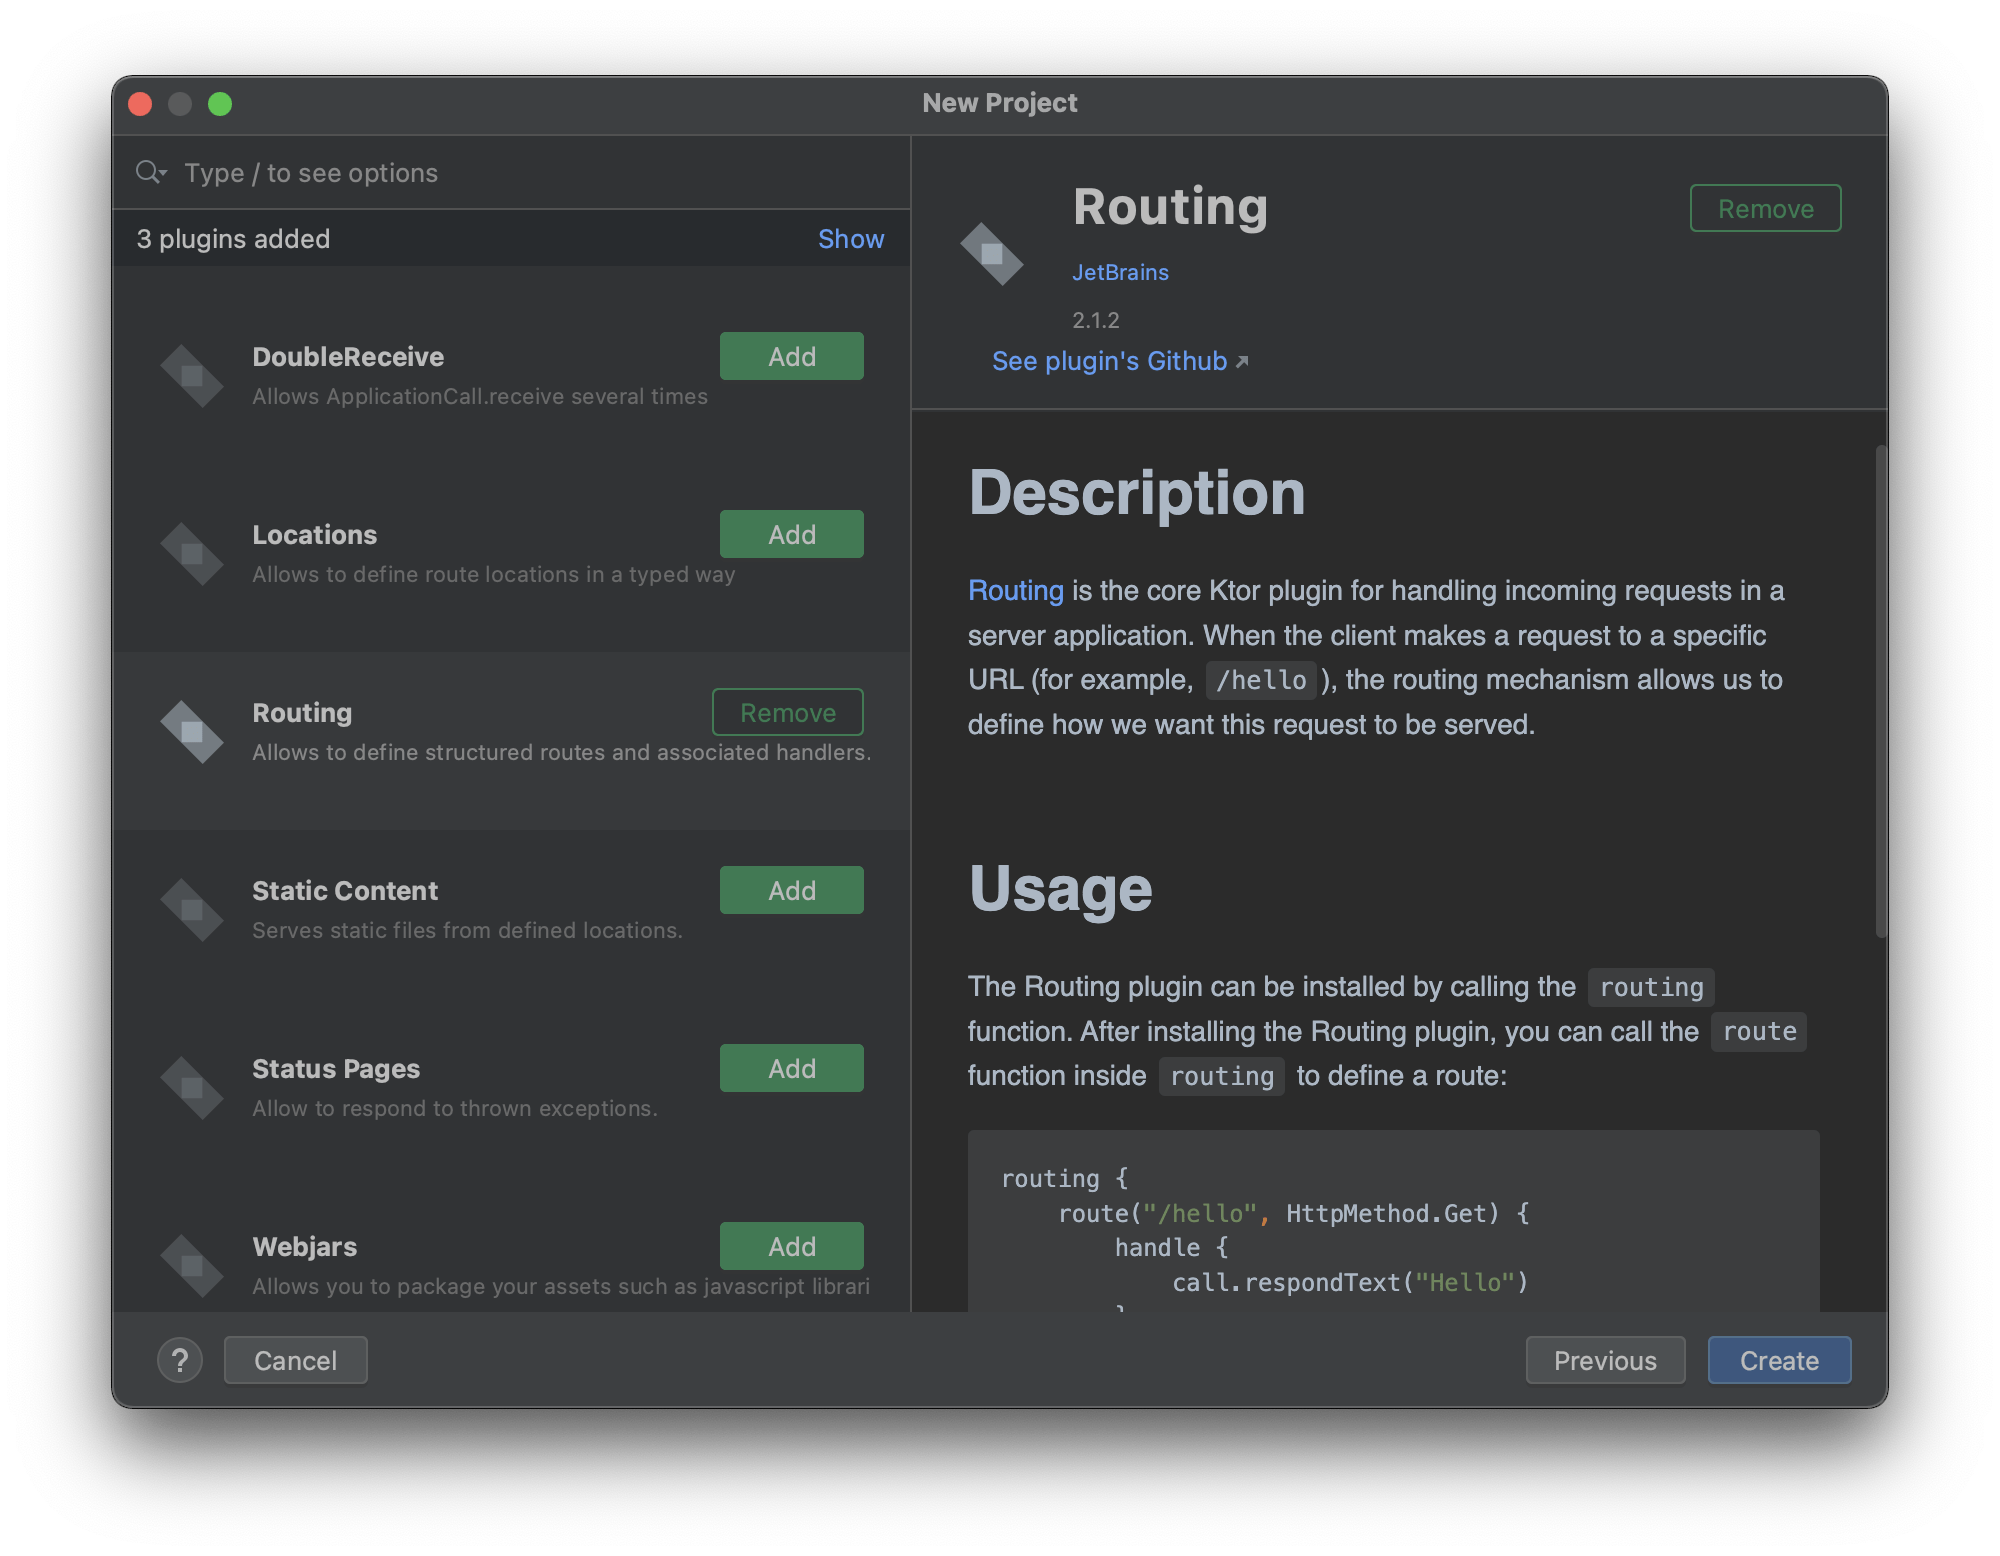
On the next page, we can install some plugins that will be included in the project. In the beginning, we need only one Routing, which is the core Ktor plugin responsible for handling requests and responses in the server application.
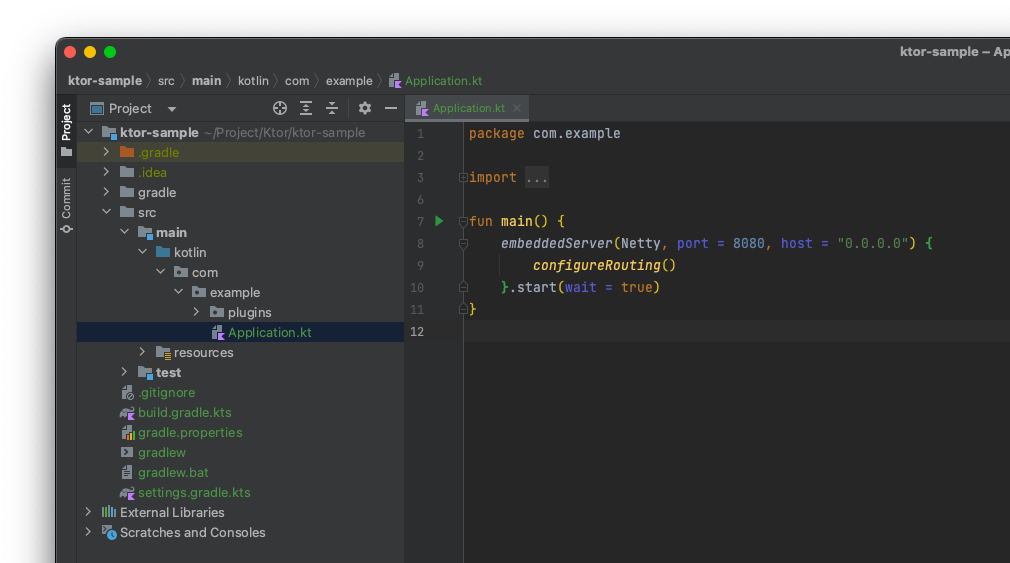
Click Create and wait for the build to end. You can see the project structure and an Application.kt on the left pane. Inside the file, we’ve got the embeddedServer function responsible for project configuration and running the application.
fun main() {
   embeddedServer(Netty, port = 8080, host = "0.0.0.0") {
       configureRouting()
   }.start(wait = true)
}
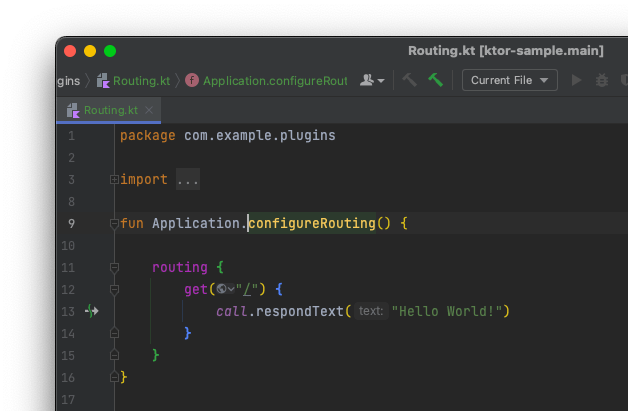
The configureRouting extension function contains the routing information.
fun Application.configureRouting() {
   routing {
       get("/") {
           call.respondText("Hello World!")
       }
   }
}
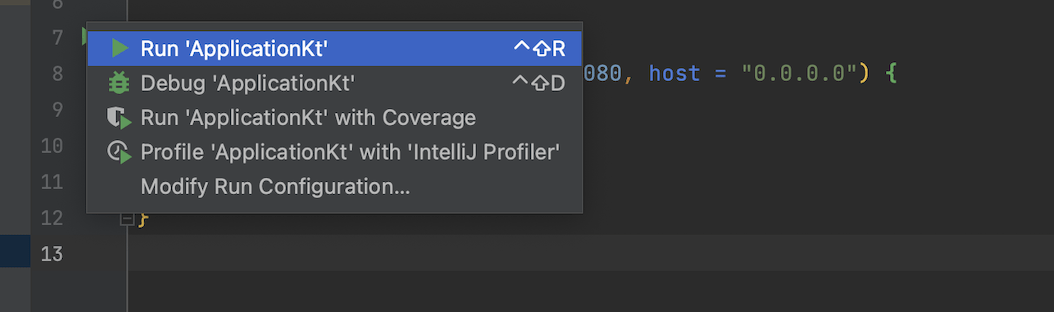
The routing with address “/” will lead us to the blank page with the “Hello World”. To check if this works, we need to run our application. Go to Application.kt and click the Run Application option from the context menu.
After the successful execution, we can see in the terminal window that the app is started on localhost, with port 8080.

With the working application, we can now go a bit further and create some basic API for our game shop.
Creating Routes – games endpoint
With our project up and running, we should think about some REST API for our Game Shop, to do this, we need to use the Routing plugin.
The plugin handles all incoming requests, provides endpoints, and serves the response. To do so, we need it in the application.
Let’s go to the configureRouting function and create CRUD endpoints for games, we can start with a route for fetching all the games in the shop. To do this, we need to define the handler.
route("/games") {
    get {
        call.respondText("Games")
    }
}
When we run our application and try to invite the GET request on the address 0.0.0.0:8080/games, we should receive the following response. IntelliJ gives us a great tool for such a call – HTTP Request.
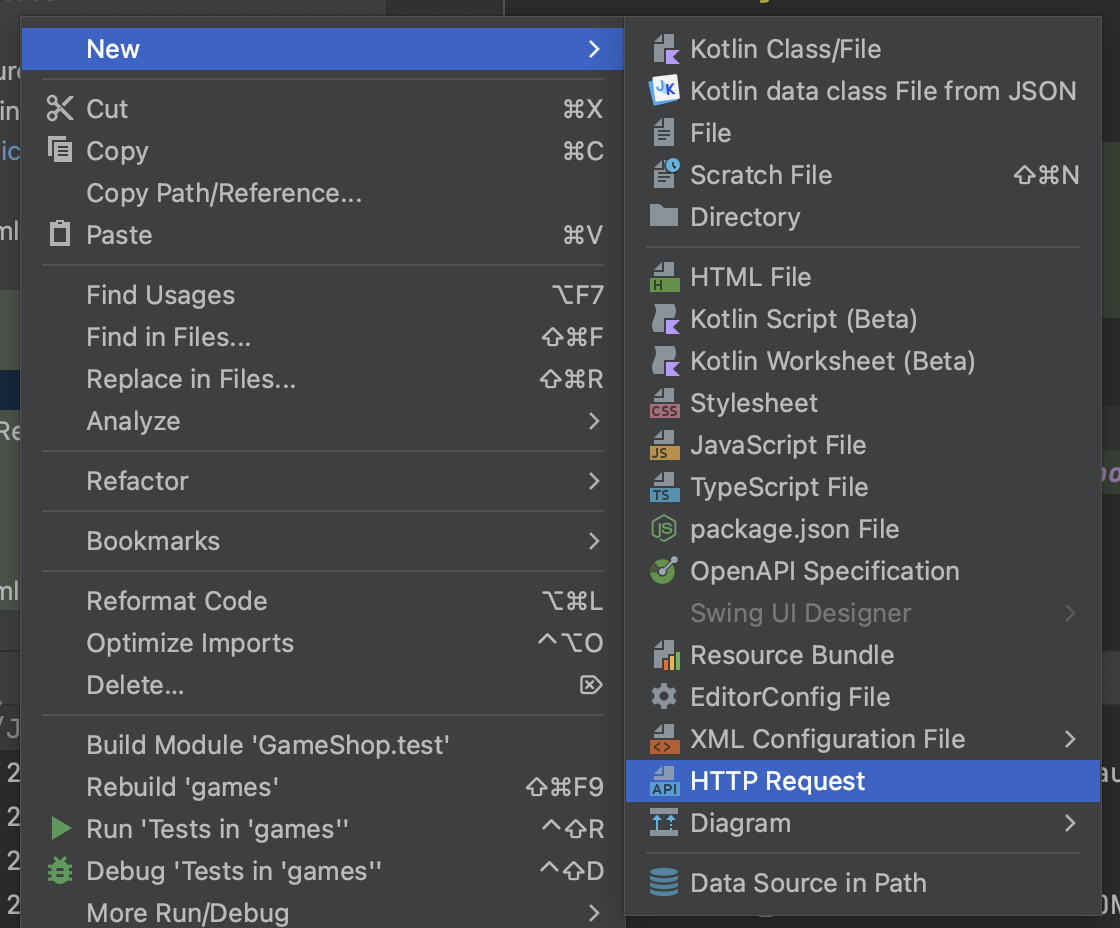
### GET - get Games List
GET http://0.0.0.0:8080/games
Content-Type: application/json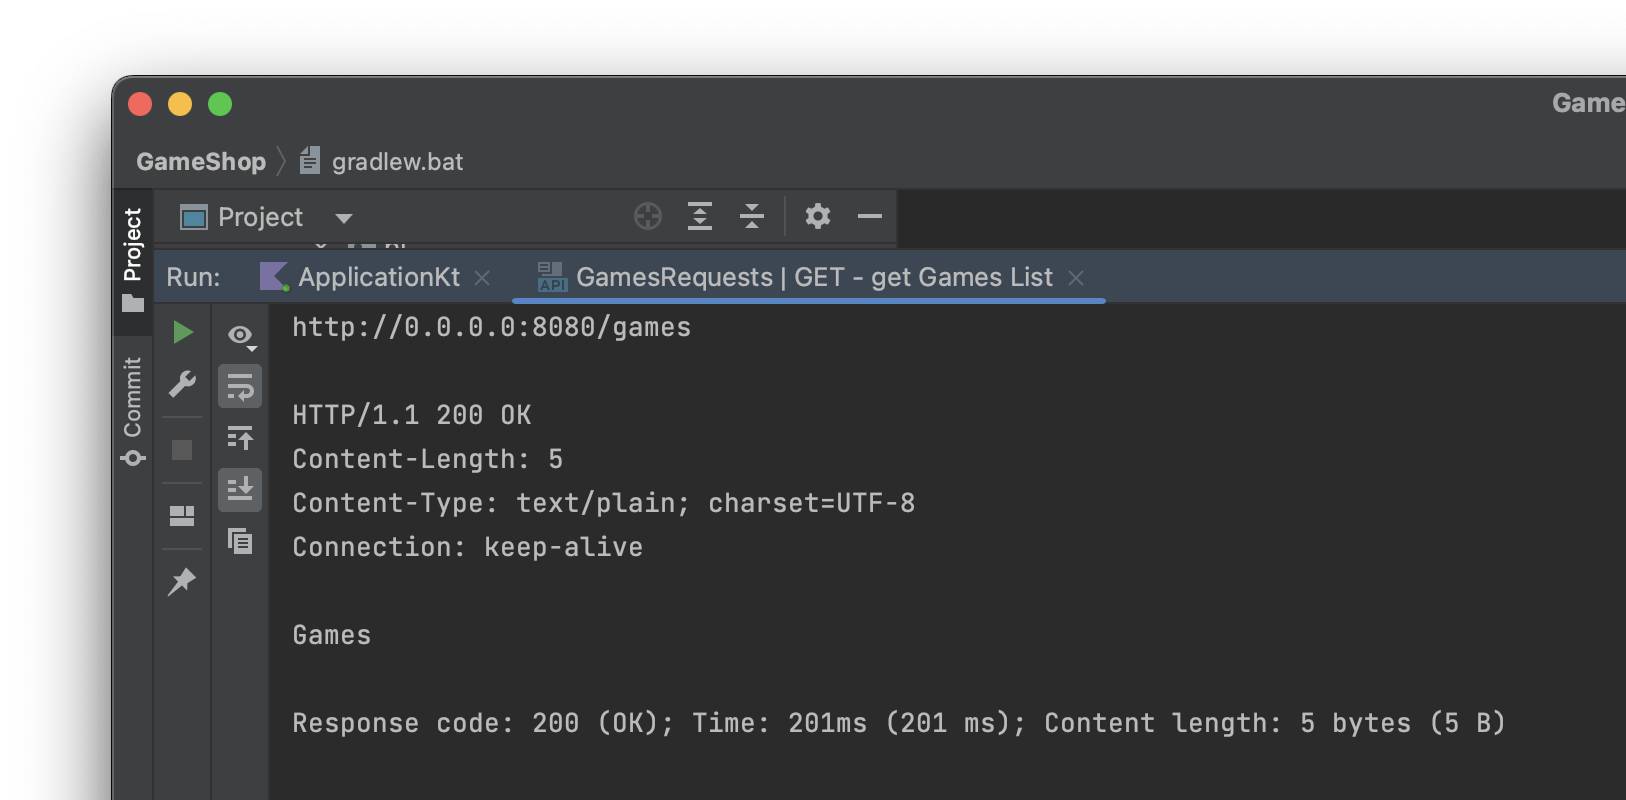
That’s it, our first endpoint with some working requests and responses. But to be honest, it’s a bit ugly, we should enhance our codebase to something more likely to be valid on a real application.
We can structurize our code, add some modules, classes, and a bit of an abstraction. In the beginning, we can divide our code into some proper packages.
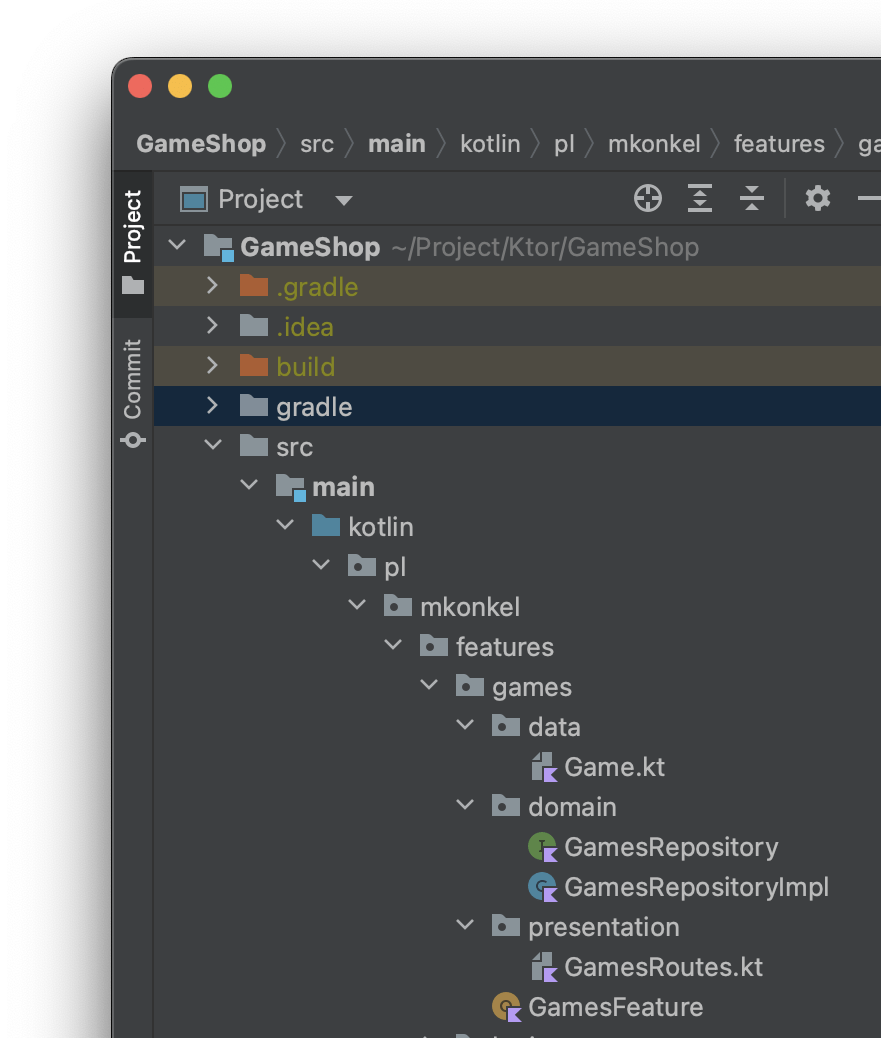
The data package will hold the request-response objects. With the usage of the kotlinx.serialization, we can create a data class that will be used in our endpoint
@Serializable
data class Game(
   val id: String,
   val name: String,
   val price: Float,
   val genre: String
)
Then in the domain package, we can create a GamesRepository interface and its implementation, for now, it will hold data in a local mutable list and simulate storage.
interface GamesRepository {
   fun getGames(): List<Game>
}

internal class GamesRepositoryImpl : GamesRepository {
   private val games: MutableList<Game> = mutableListOf()

   override fun getGames(): List<Game> {
       return games
   }
}
To be able to access the repository from any point in the app, we can create an object that will be providing the repo.
object GamesFeature {
   val repository: GamesRepository = GamesRepositoryImpl()
}
With all pieces configured, we can start working with the presentation layer, which in our case, will not include any UI but the Routing. We can create an extension function with games-specific routing.
fun Route.gamesRouting() {
   route("/games") {
       val gamesRepo = GamesFeature.repository


       get {
           val games = gamesRepo.getGames()
           call.respondText(text = games.toString(), status = HttpStatusCode.OK)
       }
If we rerun our test request, we will see that the app returns an empty array – which is correct since we didn’t add any games yet! To do so, we need to define a request data class, a repository method for adding the new game to the collection, and a new endpoint that will allow us to POST a game.
@Serializable
data class GameRequest(
   val name: String,
   val price: String,
   val genre: String
)

interface GamesRepository {
   fun addGame(game: GameRequest) : Game
}

internal class GamesRepositoryImpl : GamesRepository {
   override fun addGame(game: GameRequest): Game {
      return Game(
          id = UUID.randomUUID().toString(),
          name = game.name,
          price = game.price.toFloat(),
          genre = game.genre
       )
       .also { games.add(it) }
}

fun Route.gamesRouting() {
   route("/games") {
         post {
             val gameRequest = call.receive<GameRequest>()
             val game = gamesRepo.addGame(gameRequest)
             call.respond(
                   status = HttpStatusCode.Created,
                   message = game
             )
          }
}
There is one new thing in the code above call.receive<GameRequest>() this will allow us to retrieve the body of a POST request, which can now be passed further to a repository.
We can easily handle the response using a Ktor plugin ContentNegotiation and Serialization. To do so, we can create another extension function and use it in our Application.kt file.
fun main() {
   embeddedServer(Netty, port = 8080, host = "0.0.0.0") {
       …
       configureSerialization()
   }.start(wait = true)
}
We can also tune up a bit the GET games endpoint to handle gracefully fetching the game list.
get {
   val games = gamesRepo.getGames()

   if (games.isNotEmpty()) {
       call.respond(games)
   } else {
       call.respondText(text = "There are no games in our shop yet...", status = HttpStatusCode.OK)
   }
}
With all of that, we can try to make some requests and see if everything works fine.
### POST - Add game
POST http://0.0.0.0:8080/games
Content-Type: application/json
{
 "name": "Doom 2",
 "price": "10.00",
 "genre": "FPS"
}

### GET - get Games List
GET http://0.0.0.0:8080/games
Content-Type: application/json
Running those two requests should create a game and return the list of games. The complete example can be found on GitHub.
The routing plugin supports all the verbs, such as put, delete, head and others. It can also provide a way to specify path parameters /games/{id}, which can be obtained with a call.parameters[“id”] function or query parameters /games?genere=FPS available with call.request.queryParameters[“genre”] so we can easily model our games endpoint
get("{id?}") {
   val id = call.parameters["id"] ?: return@get call.respondText(
       text = "Id is required",
       status = HttpStatusCode.BadRequest
   )

   val game = gamesRepo.getGame(id) ?: return@get call.respondText(
       text = "Game with $id does not exist",
       status = HttpStatusCode.NotFound
   )

   call.respond(game)
}
As you can see, with the respondText and respond methods, we are providing the response to the client, thanks to the kotlinx.serialziation and content negotiation plugins, the user will receive hos data in JSON format. We can also provide response codes such as 200, 204, 400, 500, etc.
Type safe routing – orders endpoint
With some games in the shop, it would be nice to allow users to buy a game, to do so they need to place an order. From the code point of view, the design will be the same – request, response classes, repository, and routing. But to be honest, fetching parameters with call.parameters[“id”] can be tricky and requires some work – we can be smarter and use the Resources plugin that provides type-safe routing with the support of query parameters and path parameters.
First, we need to add the dependency into our gradle file and install the plugin in our application.
implementation("io.ktor:ktor-server-resources:$ktor_version")

fun main() {
   embeddedServer(Netty, port = 8080, host = "0.0.0.0") {
       install(Routing)
       install(Resources)
Then with the given structure, let’s inspect the OrdersResources.
Orders allow us to structure the code in a more convenient and easily manageable way, all resources needed to be annotated with @Serialziation and @Resources. Resources support nested classes that can indicate that our paths belong to the exact origin. The nested class needs to include its parent in the constructor parameter.
@Serializable
@Resource("/orders")
class OrdersResources(val genre: String? = null) {

   @Serializable
   @Resource("{id}")
   class Id(val parent: OrdersResources = OrdersResources(), val id: String) {
       @Serializable
       @Resource("edit")
       class Edit(val parent: Id, val name: String)

       @Serializable
       @Resource("address")
       class Address(val parent: Id)
   }
}
What we’ve done here is defining the endpoints for the orders feature, going from top to bottom, we have:
- /orders path for fetching the list of otters with optional query parameter price that can be used for filtering.
- /orders path for creating an order
- /orders/{id} path for fetching the details of one order
- /orders/(id} path for deleting the order
- /orders/(id} path for editing the order
- /orders/{id}/address path for fetching the delivery address
With such defined resources, we can go to our routing class and use the created paths – we need to visit the OrdersRoute.kt. In the beginning, we should start with something simple – a list of all games.
get<OrdersResources> {
   val orders = repo.getOrders()
   call.respond(orders)
}
That’s all, instead of writing the path, we are using the resources class.
Now fetching the order by its id.
get<OrdersResources.Id> { request ->
   val order = repo.getOrder(request.id)

   order?.let { call.respond(it) } ?: call.respondText(
       status = HttpStatusCode.BadRequest,
       text = "No such order! OrderId: ${request.id}"
   )
}
In lambda, we are able to access the request with the usage of resources the request handler is aware of the shape processing call and can easily access the id parameter and perfectly knows that its type is a String. There is nothing more left than asking the repo for an order with a given id and providing proper responses 200 with data or 400 if the order does not exist.
post<OrdersResources> {
   val orderRequest = call.receive<OrderRequest>()
   val newOrder = repo.addOrder(orderRequest)
   call.respond(newOrder)
}

delete<OrdersResources.Id> { request ->
   try {
       repo.delete(request.id)
       call.respond(
           status = HttpStatusCode.NoContent,
           message = "Order deleted"
       )
   } catch (e: Exception) {
       call.respondText(
           status = HttpStatusCode.BadRequest,
           text = "No such order! OrderId: ${request.id}"
       )
   }
}
Creating and deleting the orders works the same way, the interesting part is when we are trying to obtain only the delivery address.
get<OrdersResources.Id.Address> { request ->
   val address = repo.getOrder(request.parent.id)?.address
   address?.let { call.respond(it) } ?: call.respondText("No such order! OrderId: ${request.parent.id}")
}
If we want to obtain the id from the path, we need to call the parent nested class for it, and after that, we can fetch the address from the rest of the request path.
Using the query param is also really simple, let’s filter out orders based on their price.
get<OrdersResources> { request ->
   val price = request.price ?: 0
   val orders = repo.getOrders()
       .filter { it.price > price }

   call.respond(orders)
}
Now we can write some HTTP Requests and check if our code is working as expected. Running requests one by one, you should be able to go through the whole process.
### POST - add game
POST http://0.0.0.0:8080/games
Content-Type: application/json

{
 "name": "Doom 2",
 "price": "10.00",
 "genre": "FPS"
}

> {%
   client.global.set("game_id", response.body.id);
%}

### POST - create an order
POST http://0.0.0.0:8080/orders
Content-Type: application/json

{
 "games" : [{{game_id}}],
 "address": "Street 12, City 11-222"
}

### GET - get all orders with price greater than 20
GET http://0.0.0.0:8080/orders?price=20
Content-Type: application/json

### GET - get all orders
GET http://0.0.0.0:8080/orders
Content-Type: application/json

> {%
   client.global.set("order_id", response.body[0].id);
%}

### GET - get single order by ID
GET http://0.0.0.0:8080/orders/{{order_id}}

Content-Type: application/json

### GET - get order address
GET http://0.0.0.0:8080/orders/{{order_id}}/address
Content-Type: application/json

### DELETE - deleto order
DELETE http://0.0.0.0:8080/orders/{{order_id}}
Content-Type: application/json
We’ve reached the end of the first part of the article. I hope you’ve enjoyed it and you can’t wait for more.
Do you want to know more? Check the second and third parts of the article.